The 8th of November, 1917, was a special day in the history of the British Army. A few miles north-east of Gaza, in southern Palestine, arguably the last, pure cavalry charge in its history would be played out across the stark veldt. Horse and sword would be pitted against machine gun and artillery, and in a blaze of glory l’arme blanche would pass into the history books.
On 31 October, 1917, the British Army stormed and took Beersheba, at the eastern end of the Ottoman defensive line along the southern border of Palestine. This would be the start of the Third Battle of Gaza. The first two battles had been in March and April that year, at the end of the long British advance that had pushed the forces of the Ottoman Empire back across the Sinai Desert and away from the strategically vital Suez Canal. The two previous attacks had ended in bloody failure, but in the summer of 1917 the situation had changed. General Edmund ‘Bull’ Allenby had been sent out to Palestine to take charge of the Egyptian Expeditionary Force (EEF). With him came new troops, new technologies, and new ideas. Set against the slaughter of Passchendaele on the Western Front, the widespread mutinies among the French Armies, and the collapse of the Russian forces and government in the East, Allenby’s next move suddenly took on a significance out of all proportion to its strategic value. As the war dragged on towards yet another year, with bad news flooding in from all around and no end in sight, Britain needed a victory; more than that, it needed a symbol of hope. The British Prime Minister, David Lloyd-George, sent Allenby one simple order: To present Jerusalem as a Christmas present to the British nation.
To stand any chance of capturing Jerusalem, with all of its religious, historical and symbolic importance, by the end of 1917, Allenby would need to act fast. His first problem was the significant and well fortified Ottoman positions at Gaza on the coast and Beersheba on the desert’s edge, and the lines of trenches which ran between them. The coastal areas were heavy defended, while the further in land they went the more of a problem water became. The biggest concentration of wells in the area were at Beersheba, and any attack up the desert flank meant that these had to be taken on the first day of any offensive, or the assaulting troops would be forced to withdraw through thirst.
Over the length of October, a careful campaign of deception and misinformation was carried out. Dummy camps were set up, and false orders allowed to fall into enemy hands. Everything pointed towards a military build up for another attack on Gaza. In fact, troops were massed inland, where they poised themselves to attack Beersheba, utilising surprise to take the town rapidly. British, Australian and New Zealand infantry and cavalry were moved into carefully camouflaged camps, marching only by night, as close to the town as water supply would allow. Once the attack started, they would have just one day to take the town and its vital wells before men and horses began to drop through thirst.
On the 31st October, 1917, the offensive broke. Heavy demonstrations kept Ottoman eyes firmly on Gaza as the British, Australian and New Zealand troops of XX Corps and the Desert Mounted Corps poured out of the supposedly impassable deserts to envelope Beersheba. The garrison desperately and bravely held out through the day, but the British were equally desperate. Finally, near dusk, the mounted troopers of the Australian Light Horse achieved the supposedly impossible by charging the walls and trenches that surrounded the town, breaking through and seizing the wells before they could be destroyed.
The British now paused to consolidate their position at Beersheba, and the offensive switched flanks as the assault on Gaza started on 3 November. This soon ground to a bloody halt, but on 6 November the EEF broke out of Beersheba. XX Corps began to roll up the Ottoman defensive lines, while the Desert Mounted Corps started north, intending to cut off the remaining defenders. As it was, water shortages made the cavalry angle further to the west, giving the Ottomans the chance to see the trap closing and pull back from Gaza before they could become trapped. The race north now began.
For the Ottomans, the need was to get north out of the closing trap with enough time and space in hand to form a new defensive line. For the British, pressure needed to be kept on the Ottomans to deny them such an opportunity. The best means to apply this pressure was to push forward the cavalry.
The war in Palestine would see the British and Dominion cavalry shine brighter than in any other campaign. The open rolling terrain was ideal for fast paced wars of manoeuvre. Fodder and water became less of a problem in Palestine proper, allowing them to roam far in advance of their supporting services. Perhaps the greatest of all advantages were the cavalrymen themselves, though. From Australia and New Zealand came tough, fearless riders whose fighting skills would become legendary the world over. From Britain came a very different breed: the Yeomanry. Part of the Territorial Army, many even at this late stage in the war were still pre-war weekend warriors, mocked in peacetime as toy soldiers, decorative but of no real use. However, many had seen service in the Boer War or the regular army, and by the end of 1917 most had fought their way across the beaches and through the gullies of Gallipoli, and over the burning sands of the Sinai. In the classic British military tradition, their amateur facade masked a deep and deadly-efficient professionalism.
One of the cavalry brigades sent forth by Allenby was the 5th Mounted Brigade, consisting of the Warwickshire Yeomanry, the Queen’s Own Worcestershire Hussars (Yeomanry) and the Royal Gloucestershire Hussars (Yeomanry). All three were veterans of the Dardanelles, and had been involved in the toughest fighting of the Sinai campaigns. Spreading out to the north and east of Gaza, they kept a relentless pressure on the Ottoman rearguards. The retreating enemy dug in on every ridge and hill, and so the Yeomanry would race in close, dismount and charge the last few yards with the bayonet. As each ridge was cleared, so the Ottomans would dig in on the next, and the process start over again.
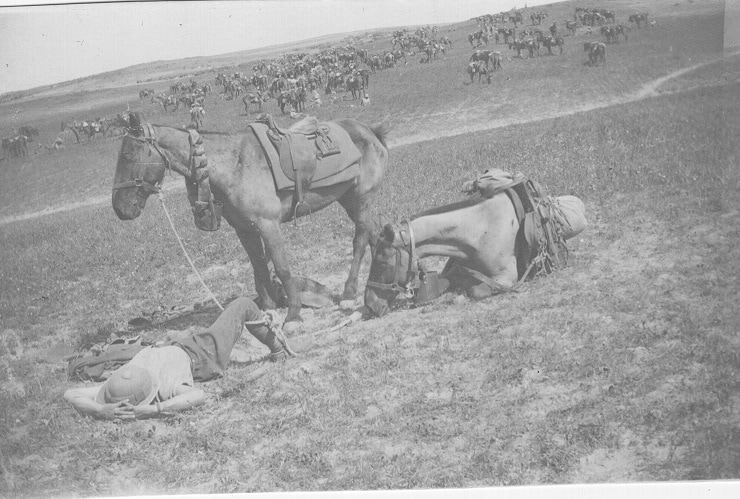
Image: Worcester Yeomen pausing for a rest in the advance.
By the 8th November, the Brigade was tired, and under-strength as troops and squadrons were detached to investigate abandoned camps and to capture known supply dumps across a wide area. At noon that day the Gloucestershires had fallen far behind while watering their horses. All told, by 1pm the main formation of the two remaining cavalry regiments could muster just five troops apiece – 85 men in the Warwickshires, and 105 in the Worcestershires. The nearest support troops were the slower moving infantry of 60th (London) Division, some two miles away.
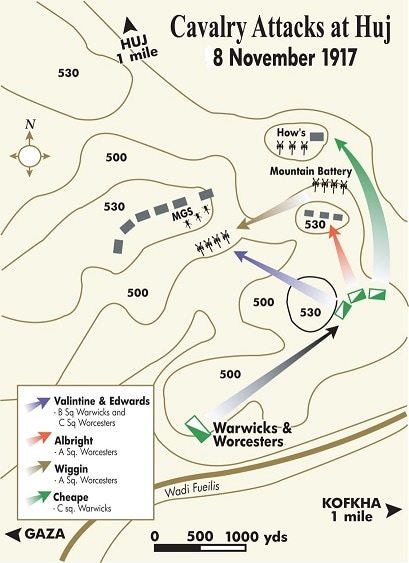
The much-reduced Brigade found themselves sheltering behind the southern tip of a low, banana-shaped ridge that gradually curved to the north-east. Ahead of them was another ridge, with a spur jutting out towards them about half way along its length. On this spur, four Austrian-crewed 75mm field guns were engaged in long-range fire against the advancing 60th Division. Behind them, and to the left as the Yeomanry saw them, four machine guns and hundreds of Ottoman infantry were in supporting positions. The ridge the Yeomanry were sheltering behind almost met the enemy held ridge at its northern tip.
Something had to be done about the Ottoman guns. The previous days had seen a myriad of similar situations, with long-range Ottoman fire causing casualties among the advancing troops, but pulling back to the next ridge as soon as the British became a threat. These guns, with their supporting troops, could keep this pattern up all day, unless action was taken quickly.
But, the question was, what should be done? Surely, a charge by 190 Yeomen against a numerically superior enemy in such a strong position would be suicidal even without presence of the machine guns and artillery? However, the lay of the land gave them an opportunity. The curving ridge, which was topped by several knolls, would give them shelter until they were in a flanking position. Even so, it could be a close run thing, and so the senior officer present, Colonel Williams of the Worcestershires, set out to the west where the 3rd Australian Light Horse Brigade were supposed to be. If he could gain their aid they may be able to make a simultaneous flanking attack from the other side, greatly increasing the chances of success. They may also have a machine-gun detachment to give suppressing fire, the 5th Mounted Brigade’s detachments having fallen behind. However, moments after Williams struck off west, a staff car pulled up behind the waiting Yeomen. Inside was General J. S. Shea, commanding officer of 60th Division, who also knew the pattern of rearguard actions had to be broken. He approached Colonel Hugh Gray-Cheape, commander of the Warwickshire Yeomanry and now senior officer present. Shea requested, but did not order, immediate action be taken to deal with the enemy guns.
Gray-Cheape gathered his men, arranging them in two lines, each a few yards from their neighbours. In front was the Worcestershire Yeomanry, now commanded by Major Bill Wiggin, with “A” Squadron under Major M. C. ‘Toby’ Albright, and two troops of “C” Squadron under Lieutenant J. W. Edwards. Behind, with enough of a gap left to allow them to steer around any fallen horses from the first wave, the Warwickshires formed up, with “B” Squadron under Captain R. Valintine, and two troops of “C” Squadron under Captain J. S. Stafford. The plan was to follow along the dead ground to the rear of their own ridge until it met the northern ridge, then sweep over and hit the guns from the flank, following on through to the machine guns and troops behind. The troopers from the signals sections, who carried pistols instead of swords, were ordered to fall out, but the order was unanimously ignored. Swords and pistols were drawn, and the advance ordered.
By the 8th November, the Brigade was tired, and under-strength as troops and squadrons were detached to investigate abandoned camps and to capture known supply dumps across a wide area. At noon that day the Gloucestershires had fallen far behind while watering their horses. All told, by 1pm the main formation of the two remaining cavalry regiments could muster just five troops apiece – 85 men in the Warwickshires, and 105 in the Worcestershires. The nearest support troops were the slower moving infantry of 60th (London) Division, some two miles away.
The much-reduced Brigade found themselves sheltering behind the southern tip of a low, banana-shaped ridge that gradually curved to the north-east. Ahead of them was another ridge, with a spur jutting out towards them about half way along its length. On this spur, four Austrian-crewed 75mm field guns were engaged in long-range fire against the advancing 60th Division. Behind them, and to the left as the Yeomanry saw them, four machine guns and hundreds of Ottoman infantry were in supporting positions. The ridge the Yeomanry were sheltering behind almost met the enemy held ridge at its northern tip.
Something had to be done about the Ottoman guns. The previous days had seen a myriad of similar situations, with long-range Ottoman fire causing casualties among the advancing troops, but pulling back to the next ridge as soon as the British became a threat. These guns, with their supporting troops, could keep this pattern up all day, unless action was taken quickly.
But, the question was, what should be done? Surely, a charge by 190 Yeomen against a numerically superior enemy in such a strong position would be suicidal even without presence of the machine guns and artillery? However, the lay of the land gave them an opportunity. The curving ridge, which was topped by several knolls, would give them shelter until they were in a flanking position. Even so, it could be a close run thing, and so the senior officer present, Colonel Williams of the Worcestershires, set out to the west where the 3rd Australian Light Horse Brigade were supposed to be. If he could gain their aid they may be able to make a simultaneous flanking attack from the other side, greatly increasing the chances of success. They may also have a machine-gun detachment to give suppressing fire, the 5th Mounted Brigade’s detachments having fallen behind. However, moments after Williams struck off west, a staff car pulled up behind the waiting Yeomen. Inside was General J. S. Shea, commanding officer of 60th Division, who also knew the pattern of rearguard actions had to be broken. He approached Colonel Hugh Gray-Cheape, commander of the Warwickshire Yeomanry and now senior officer present. Shea requested, but did not order, immediate action be taken to deal with the enemy guns.
Gray-Cheape gathered his men, arranging them in two lines, each a few yards from their neighbours. In front was the Worcestershire Yeomanry, now commanded by Major Bill Wiggin, with “A” Squadron under Major M. C. ‘Toby’ Albright, and two troops of “C” Squadron under Lieutenant J. W. Edwards. Behind, with enough of a gap left to allow them to steer around any fallen horses from the first wave, the Warwickshires formed up, with “B” Squadron under Captain R. Valintine, and two troops of “C” Squadron under Captain J. S. Stafford. The plan was to follow along the dead ground to the rear of their own ridge until it met the northern ridge, then sweep over and hit the guns from the flank, following on through to the machine guns and troops behind. The troopers from the signals sections, who carried pistols instead of swords, were ordered to fall out, but the order was unanimously ignored. Swords and pistols were drawn, and the advance ordered.
By the time the front rank reached the first of the knolls that were scattered along the crest of their ridge they had sped up to the trot. By now they were kicking up dust, and the main enemy battery had adjusted their aim, lobbing shells at where the troopers were just visible as they passed the first knoll. At one thousand yards range, and against an obscured and moving target, these shells had minimum effect, with just one Yeoman unhorsed.
Then two closer, unseen batteries opened fire.
From their starting point, the Yeomanry had not been able to clearly see the other end of their own ridge. On the second knoll, where they had planned to turn for the final charge, a screen of Ottoman infantry was fanned out along the crest, protecting four mountain guns. Further back, at a third knoll, three howitzers were positioned to lob shells over the second. With the main battery swivelled to face the Yeomen too, the two lines of troopers now found themselves in a deadly cross-fire.
Afterwards none of the survivors, even the senior officers, could remember any orders being given. What happened next seems to have been the spontaneous actions of a well-trained and highly experienced body of men. Faced with two new targets, and with no thought of retreat, the cavalry charge transformed into three charges. Col Gray-Cheape peeled off with Capt Stafford and the two troops of “C” Sqdn of the Warwickshires, and swung to the right, aiming to charge around the flank of the mountain battery and assault the howitzers. Maj Martin ‘Toby’ Albright spurred ahead with “A” Squadron of the Worcestershires, aiming to charge over the second knoll and down onto the mountain battery. Meanwhile, Lt Edwards and his two troops of Worcestershires and Capt Valintine with “B” Squadron of the Warwickshires continued to charge the main battery.
With a whirl of dust and a flash of steel, 190 men fanned out to do the impossible.
“A” Squadron of the Worcestershires had the least far to go and so hit the enemy line first. They charged 800 metres into the mountain battery, covering the ground so fast that they took few casualties until the last few paces, when a point-blank volley tore through their ranks. Troop commander Lieutenant Jack Parsons led his men straight at the guns, recording that ‘the last gun to fire put out of action the right half of my troop completely.’
Trooper Harry ‘Pat’ Crombie, an Irishman a month short of his 20th birthday, remembered reaching the guns:
“When we came close we veered right then left, which left me fourth in a row straight for an Austrian gun; first was a sergeant then Dennis Hill then Jack Turner followed by myself. A shell exploded in the mouth of the gun temporarily blinding me, [and] when I could see [again] there was nothing between me and the gun, which was about six feet from me. Sitting under it was the gunner pointing a pistol at me, I punctured his neck with my sword and went on, following Sergeant Allen and followed by Dicky Dunn, when a shell burst overhead, my mare jumped and turned. Then I saw Dicky and his horse lying on the ground, Dicky’s wrist was shattered by a piece of shrapnel and his horse’s back was broken by another piece, there were some Turks with a machine gun beside us, they did not move, so I got Dicky onto my mare and headed back to where the survivors were gathered.”
Around half of “A” Squadron were killed or wounded, including the popular Maj Albright who had been caught by the enemy’s final volley. Maj Wiggin had been with them, and now took command of the thirty-six men who were still mounted and unscathed. They were coming under fire now from the howitzers, and needed to move positions. He could see that the rest of his regiment, still only half-way across the valley, were under heavy fire from the main battery. He formed “A” Squadron and led them on to support their comrades and divide the enemy’s fire.
In the valley, “B” Squadron of the Warwickshires and “C” Squadron of the Worcestershires had the hardest task. The valley they had to cross was 1,200-1,400 metres wide, with a dry wadi running through the centre. By now Capt Valintine and the Warwickshires had managed to get ahead of Lt Edward’s two troops of Worcestershires, who were to the right and a little behind. Sgt J. Haydon was with Valintines squadron:
“We came into [sight] of their guns which sounded like a roar of thunder, they seemed to have turned every gun they had into us at one moment. Men and horses were pitch-polling on either side of me, I expected my time was coming every second. The dust was so thick we could not see the horse in front of us; some of the men galloped into a narrow deep waddie [sic] … I only missed it by a few yards, and I could hear the horses dropping into something.”
The last 100 metres of the slope towards the ridge was steep and difficult, so that any momentum the charge had gained would seep away. At least on this slope they would be sheltered from the enemy’s guns, although now a skirmish line of Ottoman infantry was spread along the crest. Once over that crest and through this screen, with momentum lost and horses blown, 200 metres of open ground lay between the struggling Yeomen and the Austrian guns.
Capt Oskar Teichman was the Medical Officer of the Worcestershires, and had chosen to follow the main charge. He and his orderlies were about 100 metres behind the main body as they crossed the crest:
“The Worcester and Warwick Squadrons, already thinned out by casualties, swept on, and topping a rise, charged through the infantry screen and were lost from view. Suddenly the terrific din of shrieking and exploding shells ceased, and we knew that the end had come.”
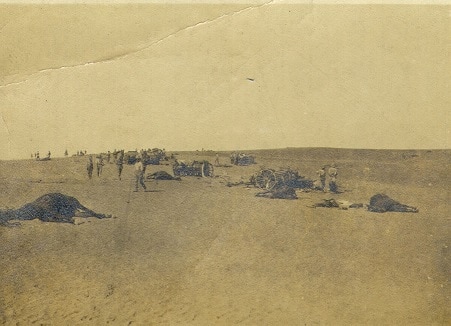

Images: The aftermath of the charge.
“B” Squadron, Warwickshires, were the first to reach the main battery, followed moments later by the two troops of “C” Squadron, Worcestershires. The enemy guns flared, and the lines seemed to disintegrate. Sgt Haydon was in the first wave as it entered the killing zone of the last two hundred metres:
“By this time our squadron only numbered 25 unhurt … I was shot, it caught me in the face, within 30 yards of the guns, I thought to myself I am only hit slightly as I could still see out of both eyes, but after a few minutes my left eye stopped up with blood. We were 10 or 12 [left] by now and carried on without a check.”
Lieutenant W. Mercer charged with Valintine:
“A whole heap of men and horses went down 20 or 30 yards from the muzzles, the Squadron broke into a few scattered horsemen at the guns then seem to melt away completely; for a time I thought I was the only man alive.”
In fact, Mercer was the only officer to charge with either of those squadrons to survive unscathed; Valintine and Edwards were both killed. “A” Squadron of the Worcestershires were only moments behind the main charge, and fifty metres short of the guns Maj Wiggin was struck in the head by a shell fragment. Though dazed, he carried on into the guns, where his horse was shot from under him. Falling to the ground, Wiggin rolled under one of the guns but was stabbed by an Austrian gunner. Only the violent intervention of one of the following Yeomen saved the Major’s life.
The guns had stopped firing as the Yeomen reached them, with the crews either fleeing or taking shelter under the guns. However, charging through the guns only meant that the four machine guns and the hundreds of infantrymen on top of the ridge could now get a clear shot at them, and more horses and men went down under their fire. Sergeant Haydon:
“I galloped round the guns like Lord Nelson with one eye blocked up … As we surrounded their guns there were Turks under each gun with all hands up, quite clear from the reach of my sword and all surrendered. I was then making for a bit of cover, and had only cantered about 30 yards from the guns when a machine-gun opened fire on me from the left rear, shooting my horse through the head and neck, as he dropped he fell across my leg and foot, pinning me down.”
Despite having already made two charges and taken heavy losses, “A” Squadron of the Worcestershires was the only formation still in any semblance of order. Now under the command of Lt Jack Parsons, a handful of men on tired horses turned against a mass of infantry. Lt Parsons:
“As we flashed past the guns I put my sword into my left hand and drew my revolver and loosed six rounds into the crowd of Turks and Austrians crowded under the last gun in the line. We then headed for a crowd of resisting Turks and again charged them at sword point … At this point my horse – a dear creature called Brownie – was shot dead and landed me on my back in a crowd of Turks. I immediately stood up, sword in hand, and started to back away from the Ottoman infantry when one of the Turks stopped and looked at me and slowly started to put his rifle to his shoulder to shoot me (we were only a few yards apart, this Turk and I, in a crowd of Turks). I instinctively grabbed my revolver and pointed it at the Turk who immediately dropped his rifle and put up his hands and joined his retreating friends. (The whole point is that there was no bullets in the revolver.)”
Even before the charge the Ottoman infantry had greatly outnumbered the Yeomen. Now, the battered remains of the Yeomanry were effectively finished as a fighting force, and only a couple of dozen men were even standing. Even so, these mounted shock troops had done enough. The Ottomans, with morale shaky after being pushed out of well-established lines and days of retreat, had now had their will to resist shattered. They had watched this tiny force of horsemen charge through a storm of shot and shell and, just, survive. They were in no mood to face these devils. Slowly and steadily, more in resignation than panic, the Ottoman forces fell back. By this time, “A” Squadron of the Queen’s Own Worcestershire Hussars (Yeomanry) consisted of Jack Parsons and Trooper J. Williams. All others had been killed or wounded.
The Medical Officer, Teichman, now came up. With his two assistants he attempted to begin the sorting and treatment of the wounded. Coming over the ridge with his medical orderlies, they were faced with a ‘wonderful and terrible sight’:
“In addition to the casualties which had already occurred in the valley, the ground was strewn with Yeomen and their horses, while under, on, and behind the guns the killed and wounded Yeomen, Austrian and Turk lay intermixed.”
The Brigade Field Ambulance was far behind, but Teichman could not wait for it:
“We commenced to dress the wounded at once, and found them scattered in all directions. Wounded Turks came crawling in, and one could not help contrasting their clean wounds, caused by our sword-thrusts, with the ghastly wounds sustained by our men from shell-fire and saw [edged] bayonet. Part of a Turko-German Field Ambulance, which had been unable to escape, was found in a hollow behind the batteries, and their equipment was invaluable to us, as our dressings soon ran out.”
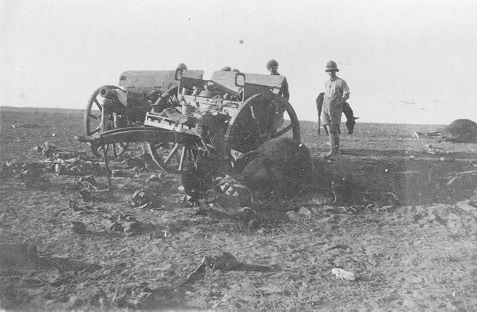
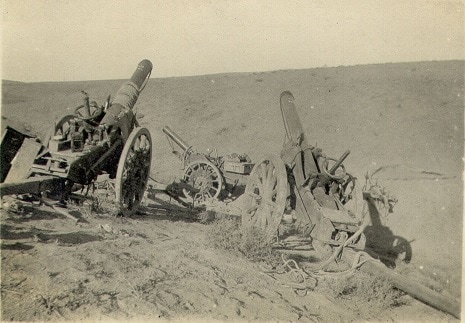
Images: Captured guns.
Gradually the Brigade began to pull themselves together. Loose detachments, who had seen or heard the fighting and rushed to catch-up, rejoined the Brigade. Parts of the Royal Gloucestershire Hussars arrived, and their machine-gun section commandeered the captured enemy machine-guns, turning them on the retreating Ottomans to discourage any ideas of counter-attacking. With the Gloucestershires was Lieutenant Robert Wilson:
“I am not particularly emotional but this was the most distressing thing I had ever seen.... The first man I saw was a friend of mine in the Worcester Yeomanry whose horse had been killed under him and who had been killed by a bayonet obviously before he had a chance to put up a fight. The next sad sight was of a sergeant in the Warwicks who I also knew; his horse was dead on its knees, wedged between the wheel and barrel of a heavy gun. The sergeant was dead in the saddle and the Austrian gunner was dead with the sergeant’s sword through his chest and his own rifle still in his hands… The Turkish infantry was scuttling away, occasionally turning to fire a few rounds but our horses were still without water so any further pursuit was out of the question. We buried those splendid yeomen at dawn and, for the first time, realised the wicked waste of war.”
Of the 190 men who had taken part in the charge, thirty-six were now dead, and fifty-seven wounded. Three out of four Squadron commanders were killed at the head of their men. The Worcestershires had suffered by far the worse casualties: out of one hundred and five officers and men, nineteen were killed and thirty nine wounded – a casualty rate of 55%. The Warwickshires had suffered less overall: seventeen killed and eighteen wounded out of eighty-five – a rate of 41% casualties - but this was because Col Gray-Cheape’s Squadron had suffered only two men wounded on their long flanking ride that had ended up capturing three howitzers. In all, one hundred and ten horses were killed or had to be destroyed.
This loss rate is perhaps lower than would be expected, from men on horses with drawn swords charging machine guns and rapid-firing artillery. The horsemen had several advantages. For one thing, the very speed of their advance gave the Ottomans and Austrians trouble as they could not adjust their sights quickly enough, and a lot of the enemy bullets and shells went over the Yeomen’s heads. The horsemen were also very well spread out. Perhaps the best known image of First World War cavalry charges today are from Steven Spielberg’s film ‘War Horse’. In that, the cavalry charge in a solid mass, knee-to-knee and hard on the heels of the men in front. While cinematographically magnificent, this is complete nonsense. In fact, the cavalry would charge with several yards between the men in each line, and further still between those lines. A single burst of machine gun fire or shell burst would only hit one or two riders. Also misleading from ‘War Horse’ is the image of riderless horse streaming on past the enemy guns. Gunners where trained to aim at the centre-mass of the target, and for an on-coming cavalryman this meant the horse’s chest. The horses were more likely to be killed than the rider, as the casualty figures show.
Capt Teichman did his best to sort and treat the wounded, among them Maj Bill Wiggin. This was the second time in as many years that Maj Wiggin had ignored serious wounds in order to stay with his men in a desperate situation. He was recommended for the Victoria Cross, but instead received a bar to his Distinguished Service Order. The Major had been unhorsed at one point and, as he lay on the ground, an Ottoman had stood over him to finish him off. Another Yeoman arrived in the nick of time to save Wiggin; for the rest of their lives, on 8 November each year, Wiggin would arrive at that Yeoman's door with a bottle of whiskey to thank him for saving his life.
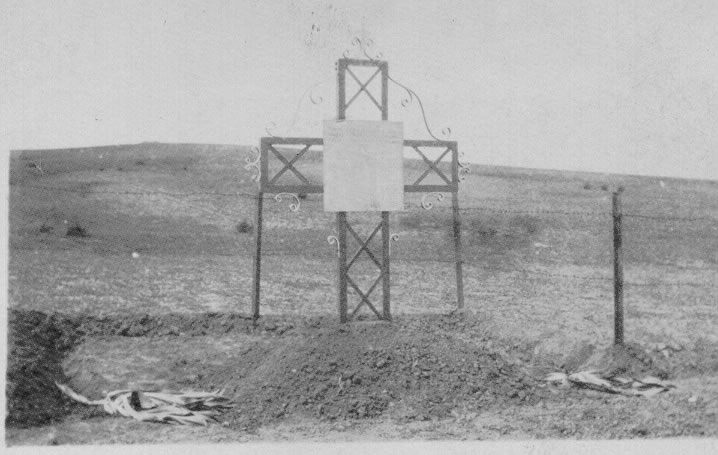
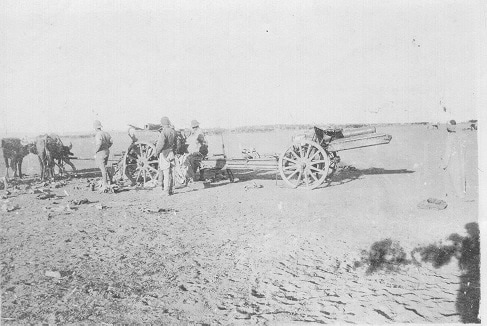
Meanwhile, the Yeomanry counted their gains as well as their losses. Eleven artillery pieces had been captured (four 75mm guns, four mountain guns, and three 5.9 howitzers), plus four machine guns, and about eighty Austrian gunners and Ottoman infantry. Roughly another ninety enemy troops had been killed. Horses were bought forward and the guns taken to the rear, while some of the oxen who had been used as teams for the guns became rations for the Yeomen. Those Yeomen who had been killed were gathered and buried in a common grave, where a memorial was later raised.
The effects of the charge reverberated through the Ottoman forces. News of the charge spread back to the headquarters of the Ottoman 8th Army in the village of Huj, only a mile away. Even though the Yeomanry were in no condition to exploit their success, the headquarters staff fled in panic. When the 60th Division entered the village some time later, they found extensive stores which the Ottomans had not thought they had time to destroy, while the abandoned headquarters contained invaluable code books which had been left behind in the rush to evacuate.
Two of the guns captured during the charge were presented to the Yeomen; one to the Worcestershires, and one to the Warwickshires. Suitable marked, they were sent back through the supply lines to be shipped to England as trophies. Unfortunately along the way the guns crossed the path of New Zealand troops who rather fancied some souvenirs of the war themselves. Both guns disappeared, and it would only be in the 1990’s that they were rediscovered as part of a war memorial in rural New Zealand. Negotiations secured the return of one of the guns, that which had been destined for the Worcestershire Yeomanry, and extensive restoration work was carried out by the Royal Artillery. It can now be seen, with other relics of the battle, at the Warwickshire Yeomanry Museum, in the Court House in Warwick.
The charge of the Yeomen at Huj would be the last pure charge of the British Cavalry. Never again would cavalry charge without infantry or artillery support, and with every man mounted. A few days later the Buckinghamshire and Dorset Yeomanry made a charge at El Mughar, but they had machine-gun and artillery support, and one squadron dismounted and made the final dash on foot. There were charges also in France in the last months of the war, but again these were all combined operations, and by the next war in 1939, the cavalry were mostly mechanised. Never again would British, horse-mounted cavalry make an unsupported charge with swords alone. After centuries of domination, the age of the cavalryman had passed. Never again would l’arme blanche prove the decisive factor, and turn the tide on the field of battle.
Images: Captured howitzers, and the mass grave of the Yeomen who were killed.
Gradually the Brigade began to pull themselves together. Loose detachments, who had seen or heard the fighting and rushed to catch-up, rejoined the Brigade. Parts of the Royal Gloucestershire Hussars arrived, and their machine-gun section commandeered the captured enemy machine-guns, turning them on the retreating Ottomans to discourage any ideas of counter-attacking. With the Gloucestershires was Lieutenant Robert Wilson:
“I am not particularly emotional but this was the most distressing thing I had ever seen.... The first man I saw was a friend of mine in the Worcester Yeomanry whose horse had been killed under him and who had been killed by a bayonet obviously before he had a chance to put up a fight. The next sad sight was of a sergeant in the Warwicks who I also knew; his horse was dead on its knees, wedged between the wheel and barrel of a heavy gun. The sergeant was dead in the saddle and the Austrian gunner was dead with the sergeant’s sword through his chest and his own rifle still in his hands… The Turkish infantry was scuttling away, occasionally turning to fire a few rounds but our horses were still without water so any further pursuit was out of the question. We buried those splendid yeomen at dawn and, for the first time, realised the wicked waste of war.”
Of the 190 men who had taken part in the charge, thirty-six were now dead, and fifty-seven wounded. Three out of four Squadron commanders were killed at the head of their men. The Worcestershires had suffered by far the worse casualties: out of one hundred and five officers and men, nineteen were killed and thirty nine wounded – a casualty rate of 55%. The Warwickshires had suffered less overall: seventeen killed and eighteen wounded out of eighty-five – a rate of 41% casualties - but this was because Col Gray-Cheape’s Squadron had suffered only two men wounded on their long flanking ride that had ended up capturing three howitzers. In all, one hundred and ten horses were killed or had to be destroyed.
This loss rate is perhaps lower than would be expected, from men on horses with drawn swords charging machine guns and rapid-firing artillery. The horsemen had several advantages. For one thing, the very speed of their advance gave the Ottomans and Austrians trouble as they could not adjust their sights quickly enough, and a lot of the enemy bullets and shells went over the Yeomen’s heads. The horsemen were also very well spread out. Perhaps the best known image of First World War cavalry charges today are from Steven Spielberg’s film ‘War Horse’. In that, the cavalry charge in a solid mass, knee-to-knee and hard on the heels of the men in front. While cinematographically magnificent, this is complete nonsense. In fact, the cavalry would charge with several yards between the men in each line, and further still between those lines. A single burst of machine gun fire or shell burst would only hit one or two riders. Also misleading from ‘War Horse’ is the image of riderless horse streaming on past the enemy guns. Gunners where trained to aim at the centre-mass of the target, and for an on-coming cavalryman this meant the horse’s chest. The horses were more likely to be killed than the rider, as the casualty figures show.
Capt Teichman did his best to sort and treat the wounded, among them Maj Bill Wiggin. This was the second time in as many years that Maj Wiggin had ignored serious wounds in order to stay with his men in a desperate situation. He was recommended for the Victoria Cross, but instead received a bar to his Distinguished Service Order. The Major had been unhorsed at one point and, as he lay on the ground, an Ottoman had stood over him to finish him off. Another Yeoman arrived in the nick of time to save Wiggin; for the rest of their lives, on 8 November each year, Wiggin would arrive at that Yeoman's door with a bottle of whiskey to thank him for saving his life.
Meanwhile, the Yeomanry counted their gains as well as their losses. Eleven artillery pieces had been captured (four 75mm guns, four mountain guns, and three 5.9 howitzers), plus four machine guns, and about eighty Austrian gunners and Ottoman infantry. Roughly another ninety enemy troops had been killed. Horses were bought forward and the guns taken to the rear, while some of the oxen who had been used as teams for the guns became rations for the Yeomen. Those Yeomen who had been killed were gathered and buried in a common grave, where a memorial was later raised.
The effects of the charge reverberated through the Ottoman forces. News of the charge spread back to the headquarters of the Ottoman 8th Army in the village of Huj, only a mile away. Even though the Yeomanry were in no condition to exploit their success, the headquarters staff fled in panic. When the 60th Division entered the village some time later, they found extensive stores which the Ottomans had not thought they had time to destroy, while the abandoned headquarters contained invaluable code books which had been left behind in the rush to evacuate.
Two of the guns captured during the charge were presented to the Yeomen; one to the Worcestershires, and one to the Warwickshires. Suitable marked, they were sent back through the supply lines to be shipped to England as trophies. Unfortunately along the way the guns crossed the path of New Zealand troops who rather fancied some souvenirs of the war themselves. Both guns disappeared, and it would only be in the 1990’s that they were rediscovered as part of a war memorial in rural New Zealand. Negotiations secured the return of one of the guns, that which had been destined for the Worcestershire Yeomanry, and extensive restoration work was carried out by the Royal Artillery. It can now be seen, with other relics of the battle, at the Warwickshire Yeomanry Museum, in the Court House in Warwick.
The charge of the Yeomen at Huj would be the last pure charge of the British Cavalry. Never again would cavalry charge without infantry or artillery support, and with every man mounted. A few days later the Buckinghamshire and Dorset Yeomanry made a charge at El Mughar, but they had machine-gun and artillery support, and one squadron dismounted and made the final dash on foot. There were charges also in France in the last months of the war, but again these were all combined operations, and by the next war in 1939, the cavalry were mostly mechanised. Never again would British, horse-mounted cavalry make an unsupported charge with swords alone. After centuries of domination, the age of the cavalryman had passed. Never again would l’arme blanche prove the decisive factor, and turn the tide on the field of battle.
Images: Captured howitzers, and the mass grave of the Yeomen who were killed.