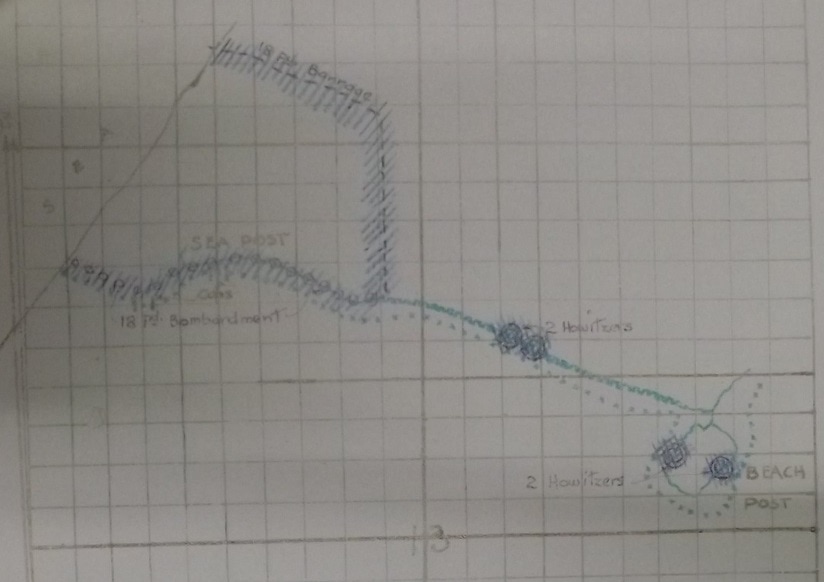
There is a bit of myth that after the 2nd Battle of Gaza, the EEF was demoralised and lost its confidence and fighting spirit. In truth, the soldiers kept confidence in themselves and as trench systems were built up south of Gaza patrolling in No Man’s Land became common. These soon grew into full scale trench raids – deliberate attacks, with artillery and other support against specific objectives by large parties of men. The first of these was the attack on the Ottoman redoubt known as Sea Post (due to its position right on the shore line) on 11 June 1917.
The scheme was the idea of Lieutenant Colonel Alexander Kearsey DSO, of the 1/5th King’s Own Scottish Borderers (KOSB), part of the 155th Brigade. He had noticed how isolated the Sea Post was, right on the Mediterranean coast (although a smaller position – Beach Post – sat a short way behind and to the west of it, almost on the waterline). With the enthusiastic approval and support of his brigad...e and divisional commanders, Kearsey built a replica of the Sea Post behind British lines, based on aerial photographs. He had teams of men trained on this full-size mock-up. His plan was thoroughly tested, modified where necessary, and approved. It went ahead after dusk on 11 June, and was a model trench raid.
For some days previously, British artillery had been cutting holes in the Ottoman wire by day, while sporadic machine gun bursts discouraged them from repairing them at night. At 5pm on 11 June, a brief barrage of seventy-seven shells was fired at the gaps. After dark, a British patrol set out to check the holes and look for Ottoman patrols. At 8.20pm they reported all clear, and the two Main Assault Parties set out under the overall command of Lt. Turner. These two forces, under Lieutenants McGeorge and Mackinnon, each consisted of fifteen riflemen (some armed also with axes, in case of unexpected obstacles) and two bombing parties totalling another fourteen men. Although all men had fully charged magazines in their rifles, none had a round chambered, so there was no chance of an accidental shot warning the enemy. They crept out and took up position about 200 metres (220 yards) from the Sea Post. At 8.54pm another brief barrage, just two minutes in duration, struck the wire, allowing the two raiding parties to dash forward another 100 metres (110 yards). There followed a two minute gap, and then another two minute barrage fell upon the post itself. At the same time, diversionary actions opened further east along the brigade’s lines. Careful monitoring had revealed that the Ottoman night-time distress signal was three red flares, and a spot in the 1/5th Royal Scots Fusiliers (RSF) trenches had been chosen from where such a signal could be launched which, when seen from the main Ottoman observation posts on Ali Muntar, would appear to have come from their Umbrella Hill positions. Sure enough, believing that their post there was under attack, Ottoman artillery immediately began shelling the area ahead of Umbrella Hill. This barrage would cost the Royal Scots three men killed and one wounded, but it also kept Ottoman attention on the wrong area of their line. At the same time, slightly further east, the 1/5th Highland Light Infantry (HLI) began to pull ropes which were attached to dummies that they had seeded across No Man’s Land. The figures lurched up and down in the light of further flares, drawing more fire and attention.

With the situation suitable muddied, if not utterly chaotic, the barrage lifted from the Sea Post and resumed 200 metres (220 yards) beyond to the north and the east, blocking any possible Ottoman attempts to counter-attack from those sides. This work was supported by the 155th Machine Gun Company, who would fire some 10,600 rounds across No Man’s Land to suppress enemy movement. The raiding par...ties of the 1/5th KOSB rushed in to the Sea Post. The bombardment had pushed most of the defenders underground, and the dozen that remained where killed or wounded in a brutal flurry of bayonets and axe-blows. Even as the Scots poured in, Lieutenant H. Burt led a supporting bombing party on, around the Sea Post and astride the four communications trenches that ran back towards the main Ottoman lines. In these, they pulled down the parapets to create trench-blocks, over which they could lob their bombs, and which they vigorously defended against the few Ottoman soldiers willing to risk running through the blockading barrages. In one trench, an attempt by some of the Sea Post garrison to retreat led to the bombing party being attacked from both sides, but they drove both sets of attackers off. Meanwhile a Reserve Assault Party moved up ready to back up either of the Main Assault Parties, as did a Support Party ready to give covering fire. Supporting parties of signallers, more bombers, and extra axemen also moved forward, while a Reserve Party readied itself in the British lines in case of disaster.
With the Sea Post isolated and occupied, the main task of destruction began. As the raiders had gone in, the Support Party (under Captain J. B. Penman, also in overall command of the raid) followed across No Man’s Land. They included a Booty Party who began searching for enemy papers, weapons and equipment, while two Demolition Parties also arrived and began to destroy the Post systematically. Many Ottoman soldiers were found to have taken shelter in deep dug-outs. Those that could be were enticed out and taken prisoner; those who could not where buried as the dug outs were blown. The trenches and barbed wire entanglements were also destroyed where possible, and mines were laid in the wire above the main post and on the trench-blocks in the communications trenches. Happy that the work was complete, Penman blew the recall signal on his whistle, and, covered by the Supports and Reserves, the bombers, raiders and demolition men withdrew to their own trenches. Meanwhile, a Beach Party (with their own Beach Party Reserve), had attacked the Beach Post, and now withdrew as well.
The raid had taken just fifteen minutes from the lifting of the second barrage to the recovery of the last raider into their own trenches, where a tot of rum awaited every man. Just one of the raiders had been wounded, accidentally injuring his own foot with an axe, while 60-100 Ottomans were estimated as killed. Regrettably, an over-enthusiastic bomber had blown up the headquarters dug-out before it could be searched, but at least they had brought back a dozen prisoners for questioning, while a Lewis Gun that had fallen into Ottoman hands during the 1st Battle of Gaza, and which was being used by them in the Post, was also brought back. Including the enlarged Regiment Aid Post established near the scene, but not the men of the supporting nine artillery batteries, the machine gunners, or the several battalions involved in decoy operations, the raid had involved over 370 officer and men (all of whom had been issued a white arm band for ready identification at night; after all, the Ottomans also wore khaki uniforms). Captain Penman and Lieutenant Mackinnon were awarded the Military Cross, and Privates A. Paul and J. Dickson the Military Medal. Several others were Mentioned in Despatches.
Order of Battle: 1/5th King’s Own Scottish Borderers raid on Sea Post, 11 June 1917
First Wave: (OC Assault Lt. Turner)
Left Assault Party:...
1 officer (2/Lt MacKinnon), 15 riflemen (5 armed with hatchets)
2 x Bombing Parties: Each of 1 NCO, 2 throwers, 2 bayonet men, and 2 bomb carriers
2 sandbaggers (each with a shovel and 25 empty bags)
Followed by: 1 Royal Engineer and 3 other ranks with heavy axes.
(All drawn from D Company)
Right Assault Party:
1 officer (Lt. McGeorge), 15 riflemen (5 armed with hatchets)
2 x Bombing Parties: Each of 1 NCO, 2 throwers, 2 bayonet men and 2 bomb carriers
2 sandbaggers (each with a shovel and 25 empty bags)
Followed by: 1 Royal Engineer and 3 other ranks with heavy axes.
(1 Bombing Party from B Company, all others from C Company)
Second Wave: (OC Supports Capt Sir R. G. W. Grierson)
Reserve Assault Party:
1 officer (Lt. Muir), 15 riflemen (5 armed with hatchets)
2 x Bombing Parties: Each of 1 NCO, 2 throwers, 2 bayonet men and 2 bomb carriers
2 sandbaggers (each with a shovel and 25 empty bags)
(All from A Company)
Support Party:
1 officer (Capt. Penman) and 25 riflemen
Booty Party: 10 other ranks (to collect enemy weapons, equipment or documents)
(All from C Company)
Others:
Battalion Bombing Officer (Lt. Burt, attached from 1/5th Argyll and Sutherland Highlanders)
5 Royal Engineers
2 axemen (from A Company)
6 bomb carriers
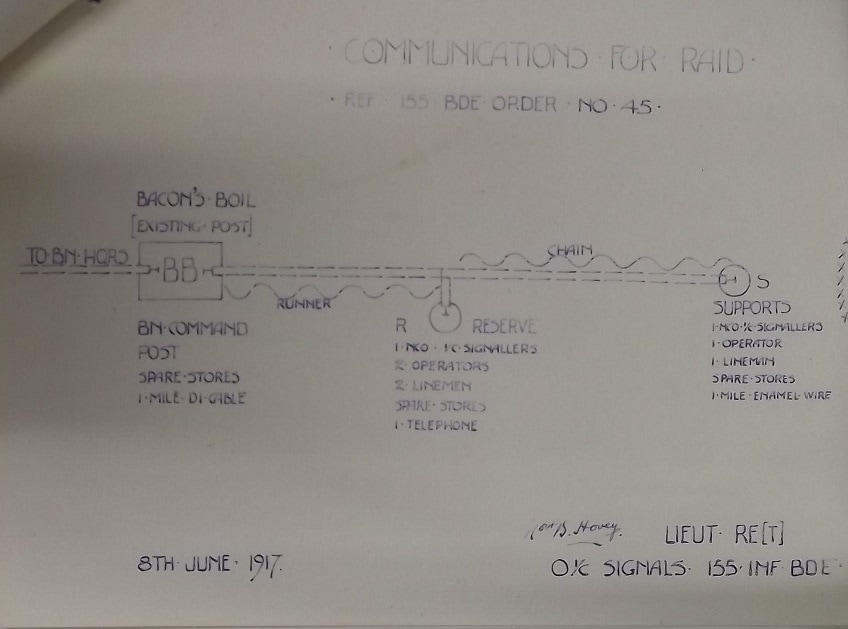
Support Signal Party: 1 NCO, 1 telephone operator and 1 linesman, plus 8 runners
4 Stretcher Bearers (2 stretchers) (from A Company)
Third Wave:
Bombing Reserve: 1 officer and 5 bomb carriers
Reserve Signal Party: 1 NCO, 2 telephone operators and 2 linesmen, plus runners
2 x Demolition Parties: Each of 4 Royal Engineers (3 with heavy axes, 1 with a mine)
Medical Party: 4 Stretcher Bearers (2 stretchers)
Reserve:
2 officers (Capt. Gibson (OC Reserve) and Capt. Johnstone), 60 other ranks (from A Company)
2 x Bombing Parties: Each of 1 NCO, 2 throwers, 2 bayonet men and 2 bomb carriers (attached from 1/4th KOSB)
1 Lewis Gun (from A Company)
12 bomb carriers (from C Company)
2 Royal Engineer Parties: Each of 3 Royal Engineers
12 Stretcher Bearers (6 stretchers) (from B, C and D Companies)
Beach Party:
1 officer (Lt McEwan), 25 other ranks (from C Company)
1 Lewis Gun (from C Company)
1 Bombing Party: 1 NCO, 2 throwers, 2 bayonet men and 2 bomb carriers (attached from 1/4th KOSB)
Beach Party Reserve:
1 officer (Capt. Scott Elliot), 15 other ranks (from C Company)
1 Bombing Party: 1 NCO, 2 throwers, 2 bayonet men and 2 bomb carriers (attached from 1/4th KOSB)
3 bomb carriers (from C Company)
4 Stretcher Bearers (2 stretchers) (supplied by 1/4th KOSB)
Regimental Aid Post:
3rd Lowland Field Ambulance
10 Stretcher Bearers (5 stretchers) each from 1/4th KOSB and 1/5th Royal Scots Fusiliers
Artillery support:
A, B and C Batteries, 261st Brigade, Royal Field Artillery
A, B and C Batteries, 262nd Brigade, Royal Field Artillery
A and B Batteries, 267th Brigade, Royal Field Artillery
Total from 1/5th KOSB:
11 officers and 361 NCOs and other ranks
(Not including troops providing supporting fire from 1/4th King’s Own Scottish Borderers, 1/5th Royal Scots Fusiliers, 1/6th and 1/5th Highland Light Infantry, 1/5th Argyll and Sutherland Highlands, 155th Brigade Machine Gun Company, and Royal Field Artillery)
First Wave: (OC Assault Lt. Turner)
Left Assault Party:...
1 officer (2/Lt MacKinnon), 15 riflemen (5 armed with hatchets)
2 x Bombing Parties: Each of 1 NCO, 2 throwers, 2 bayonet men, and 2 bomb carriers
2 sandbaggers (each with a shovel and 25 empty bags)
Followed by: 1 Royal Engineer and 3 other ranks with heavy axes.
(All drawn from D Company)
Right Assault Party:
1 officer (Lt. McGeorge), 15 riflemen (5 armed with hatchets)
2 x Bombing Parties: Each of 1 NCO, 2 throwers, 2 bayonet men and 2 bomb carriers
2 sandbaggers (each with a shovel and 25 empty bags)
Followed by: 1 Royal Engineer and 3 other ranks with heavy axes.
(1 Bombing Party from B Company, all others from C Company)
Second Wave: (OC Supports Capt Sir R. G. W. Grierson)
Reserve Assault Party:
1 officer (Lt. Muir), 15 riflemen (5 armed with hatchets)
2 x Bombing Parties: Each of 1 NCO, 2 throwers, 2 bayonet men and 2 bomb carriers
2 sandbaggers (each with a shovel and 25 empty bags)
(All from A Company)
Support Party:
1 officer (Capt. Penman) and 25 riflemen
Booty Party: 10 other ranks (to collect enemy weapons, equipment or documents)
(All from C Company)
Others:
Battalion Bombing Officer (Lt. Burt, attached from 1/5th Argyll and Sutherland Highlanders)
5 Royal Engineers
2 axemen (from A Company)
6 bomb carriers
Support Signal Party: 1 NCO, 1 telephone operator and 1 linesman, plus 8 runners
4 Stretcher Bearers (2 stretchers) (from A Company)
Third Wave:
Bombing Reserve: 1 officer and 5 bomb carriers
Reserve Signal Party: 1 NCO, 2 telephone operators and 2 linesmen, plus runners
2 x Demolition Parties: Each of 4 Royal Engineers (3 with heavy axes, 1 with a mine)
Medical Party: 4 Stretcher Bearers (2 stretchers)
Reserve:
2 officers (Capt. Gibson (OC Reserve) and Capt. Johnstone), 60 other ranks (from A Company)
2 x Bombing Parties: Each of 1 NCO, 2 throwers, 2 bayonet men and 2 bomb carriers (attached from 1/4th KOSB)
1 Lewis Gun (from A Company)
12 bomb carriers (from C Company)
2 Royal Engineer Parties: Each of 3 Royal Engineers
12 Stretcher Bearers (6 stretchers) (from B, C and D Companies)
Beach Party:
1 officer (Lt McEwan), 25 other ranks (from C Company)
1 Lewis Gun (from C Company)
1 Bombing Party: 1 NCO, 2 throwers, 2 bayonet men and 2 bomb carriers (attached from 1/4th KOSB)
Beach Party Reserve:
1 officer (Capt. Scott Elliot), 15 other ranks (from C Company)
1 Bombing Party: 1 NCO, 2 throwers, 2 bayonet men and 2 bomb carriers (attached from 1/4th KOSB)
3 bomb carriers (from C Company)
4 Stretcher Bearers (2 stretchers) (supplied by 1/4th KOSB)
Regimental Aid Post:
3rd Lowland Field Ambulance
10 Stretcher Bearers (5 stretchers) each from 1/4th KOSB and 1/5th Royal Scots Fusiliers
Artillery support:
A, B and C Batteries, 261st Brigade, Royal Field Artillery
A, B and C Batteries, 262nd Brigade, Royal Field Artillery
A and B Batteries, 267th Brigade, Royal Field Artillery
Total from 1/5th KOSB:
11 officers and 361 NCOs and other ranks
(Not including troops providing supporting fire from 1/4th King’s Own Scottish Borderers, 1/5th Royal Scots Fusiliers, 1/6th and 1/5th Highland Light Infantry, 1/5th Argyll and Sutherland Highlands, 155th Brigade Machine Gun Company, and Royal Field Artillery)